Ciao amiche!!!
Oggi sono di nuovo con voi
per mostrarvi come si fa' una Criss Cross con taschine.
Hello friends!!!
Today I'm back with you
to show you how to make a Criss Cross with pockets.
Materiali
Un foglio di carta design Double Face 30x30
colla
matita
pieghetta
Materiale per decorare
Materials
A sheet of paper design 30 x 30 Double-sided glue
pencil
Tuck
Material to decorate as you like
Fase 1
Fate un rotondo di circa 25 cm
io ho usato il mio coperchio delle torte
ma se' avete la cameo potete usare quella.
Step 1
Take a round of about 25 cm
I used my cake cover
But if you have the cameo you can use that.
Fate il cerchio con la matita
e poi tagliate
Make the circle with a pencil
and then cut
Ora avete un cerchio
You now have a circle
Fase 2
Piegare a metà
Step 2
fold in half
Poi piegare doppi lati verso il centro
Then fold double sides towards the Centre
Piegare verso l'alto
Fold upwards
Fase 3
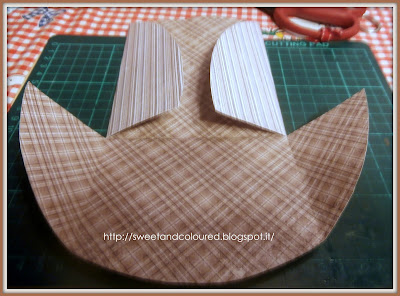
Aprire il cerchio e tagliare i lembi lungo l'ultimo bordo piega
Step 3
Open the circle and cut the flaps along the last fold edge
Ripiegare i lembi all'esterno
Fold the flaps on the outside
Piegare di nuovo scegliendo il lato da incollare
Fold again by choosing the paste
Incollate i lati e otterrete le taschine
Per fare invece l'ultima tasca basta tagliare un rettangolo
Glue the sides and you will get the mounts
To make the last Pocket instead just cut a rectangle
Incollate i lati io ho aggiunto del merletto per decorare
Glue the sides I added lace to decorate
Infine decorate la vostra card come più vi piace
io l'ho decorata in questo modo
Finally decorate your card as you like
I decorated this way
Spero che il mio tutorial sia di vostro gradimento!!!
Vi ricordo che tutti i materiali usati li trovate sul negozio
on line di Timbroscrapmaia
cliccate
qui per andarci direttamente.
Vi saluto augurandovi una meravigliosa giornata!!!
Buon divertimento Scrappine a presto!!!
I hope my tutorial is to your liking!
I remind you that all the materials used can be found on the shop
Timbroscrapmaia online click here to go there directly.
I greet you and wish you a wonderful day!!!
Have fun Scrappine soon!
Hugs Tiziana


