Ciao a tutti voi!!!
Nuovo tutorial!!!
Peek a Boo Card
Hi eveyone!!!
New tutorial !!!
Peek a Boo Card
Materriale
Cartoncino Bazzil
Carta Designer
Colla
Righello
Matita
Scoring board
Materiale per decorare a piacere
Materials
Cardboard bazzil
ard designer
glue
ruler
pencil
scoring board
Material to decorate as you like

Fase 1
Tagliare il cartoncino Bazzil qui ho usato un cartoncino Kraft
nelle seguenti misure
5 1/2" x 8 1/4"
5 1/2" x 8 1/2"
5 1/2" x 5 3/4"
Tagliate la carda decorata
nelle seguenti misure
5 3/8" x 5 3/8"
2 pezzi
5 3/8" x 4 1/8"
Step 1
Cut the cardstock Bazzill here I used a cardboard Kraft
in the following sizes
5 1/2 "x 8 1/4"
5 1/2 "x 8 1/2"
5 1/2 "x 5 3/4"
Cut the cards decorated
in the following sizes
5 3/8 "x 5 3/8"
2 pieces
5 3/8 "x 4 1/8"
Fase 2
Prendete i pezzi di cartoncino Bazzil e fate le cordonature
cartoncino che misura
5 1/2" x 8 1/4"
piega a 2 3/4"
Cartoncino che misura
5 1/2" x 8 1/2"
piega a 4 1/4"
Cartoncino che misura
5 1/2" x 5 3/4"
piega a 5 1/2"
Step 2
Take the pieces of cardstock Bazzill and make the cordoned
cardstock that measures
5 1/2 "x 8 1/4"
fold to 2 3/4 "
Cardstock that measures
5 1/2 "x 8 1/2"
fold to 4 1/4 "
Cardstock that measures
5 1/2 "x 5 3/4"
fold in 5 1/2 "
Fase 3
Rivestite i pezzi con la carta design che avete scelto
Step3
Coat the pieces with the card design you have chosen
Fase 4
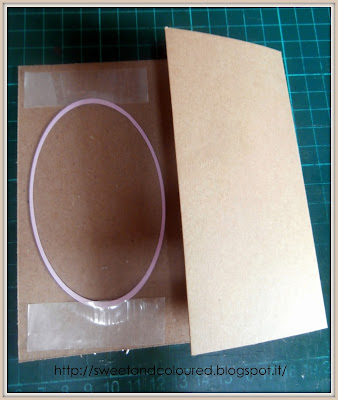
Prendete una fustella ovale posizionatela come nella foto
sul pezzo
5 1/2" x 8 1/4"
Step4
Take a die oval positioned as pictured
on the piece
5 1/2 "x 8 1/4"
Fase 5
Tagliate e lasciate la fustella attaccata come in foto
Step5
Cut and let the die attacked as in photo
Step 6
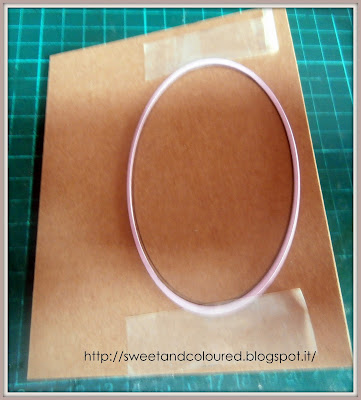
Prendete l'altro pezzo di bazzil che misura
5 1/2" x 8 1/2"
Mettetela come su questa foto rifate l ovale con la matita
Step 6
Take the other piece of that measure bazil
5 1/2 "x 8 1/2"
Put it like this photo redo the oval with a pencil
poi mettete la fustella sul disegno e tagliate
then put the punch on the drawing and cut
Fase 7
Mettete la colla come in foto
Step7
Put the glue as in photo
Incollate sopra l'altro pezzo soprapponendo i due pezzi perfettamente
lued over the other piece overlapping the two pieces perfectly
Fase 8
Prendete l'ultimo pezzo e mettete la colla
Step 8
Take the last piece and put the glue
Incollate come in foto
Glued as in photo
Step 9
Mettete sotto il timbro
Step9
Put under the stamp
Fate con la matita l'ovale
Take your pencil oval
e incollate il primo timbro quello che sta sul davanti
Step 10
Incollate il secondo timbro come da foto
Step 10
Glue the second stamps as photos
Guardando le foto dovete avere i timbri messi in questo modo
Looking at the pictures you need to have the stamps put it this way
Poi inserite un pezzo dentro l'altro e avrete la card aperta così
Then place a piece inside the other and you have the card open so
e chiusa così
and closed so
Infine decorate a piacere
Questa è la card terminata.
Finally decorate as desired
This is the finished card.
Spero che sia di vostro anche questo tutorial!!!
Vi ricordo che tutti i materiali che ho usato li trovate nel negozio on line
cliccate qui per andarci direttamente.
Vi saluto augurandovi una Meravigliosa giornata e
Buon Divertimento Scrappine!!!
I hope my tutorial was to yours liking !!!
All the materials I used can be found in the online store
click here to go there directly.
I greet you and wish you a Wonderful Day
Good fun Scrappine !!!
Hugs Tiziana


ebbrava lei fanciulla....un bel tuttttttorialllllllllllllllllllllllllllllllllllllllllllllllllllllllllllllllllllllllllllllllllllllllllllllllllllllllllllllllllllllllllllllllllllllllll
RispondiEliminaChe bello, vorrei provarci. Perfavore hai le misure in cm? Grazie, Laura
RispondiElimina